
Mastering Container Management: Why We Chose AWS ECS Over Kubernetes for Scaling and Efficiency
Unlock the Secrets to Effortless Container Management with AWS ECS—Here’s Why We Ditched Kubernetes
.svg)


Using ECS to manage and orchestrate scrapyd instances.
In the previous article we were able to dockerize our application so it can be run on isolated containers. We modified scrapyd behavior to make it rely on one shared queue between the different containers.
It’s time to figure out how the container infrastructure will be managed. How to handle scaling up/down depending on the demand ? How to handle provisioning new containers and updating them with the latest code ?
In order to do this it was clear that we needed an orchestration tool. When we say container orchestration people usually think of kubernetes but for our use, resources and budget we went a different direction. We rather opted for aws ECS. This is why:
- Less Overhead: AWS takes on the responsibility for managing the ECS infrastructure, reducing the workload on our small team and allowing us to focus more on application development. It's a simpler platform to navigate and manage, requiring less upkeep and configuration than Kubernetes.
- Seamless integration with AWS services: ECS integrates tightly with AWS services such as Elastic Load Balancer, Identity and Access Management (IAM), and Auto Scaling, among others.
- Cost Efficiency: ECS comes at no additional cost, we only pay for the resources (like EC2 instances or EBS volumes) we used.
- Built in monitoring: ECS comes with built-in monitoring capabilities through integration with AWS CloudWatch, providing real-time insights and comprehensive visibility on resources utilization directly from your the aws AWS console.
The following image illustrates the different aws ressource we need to put in place:
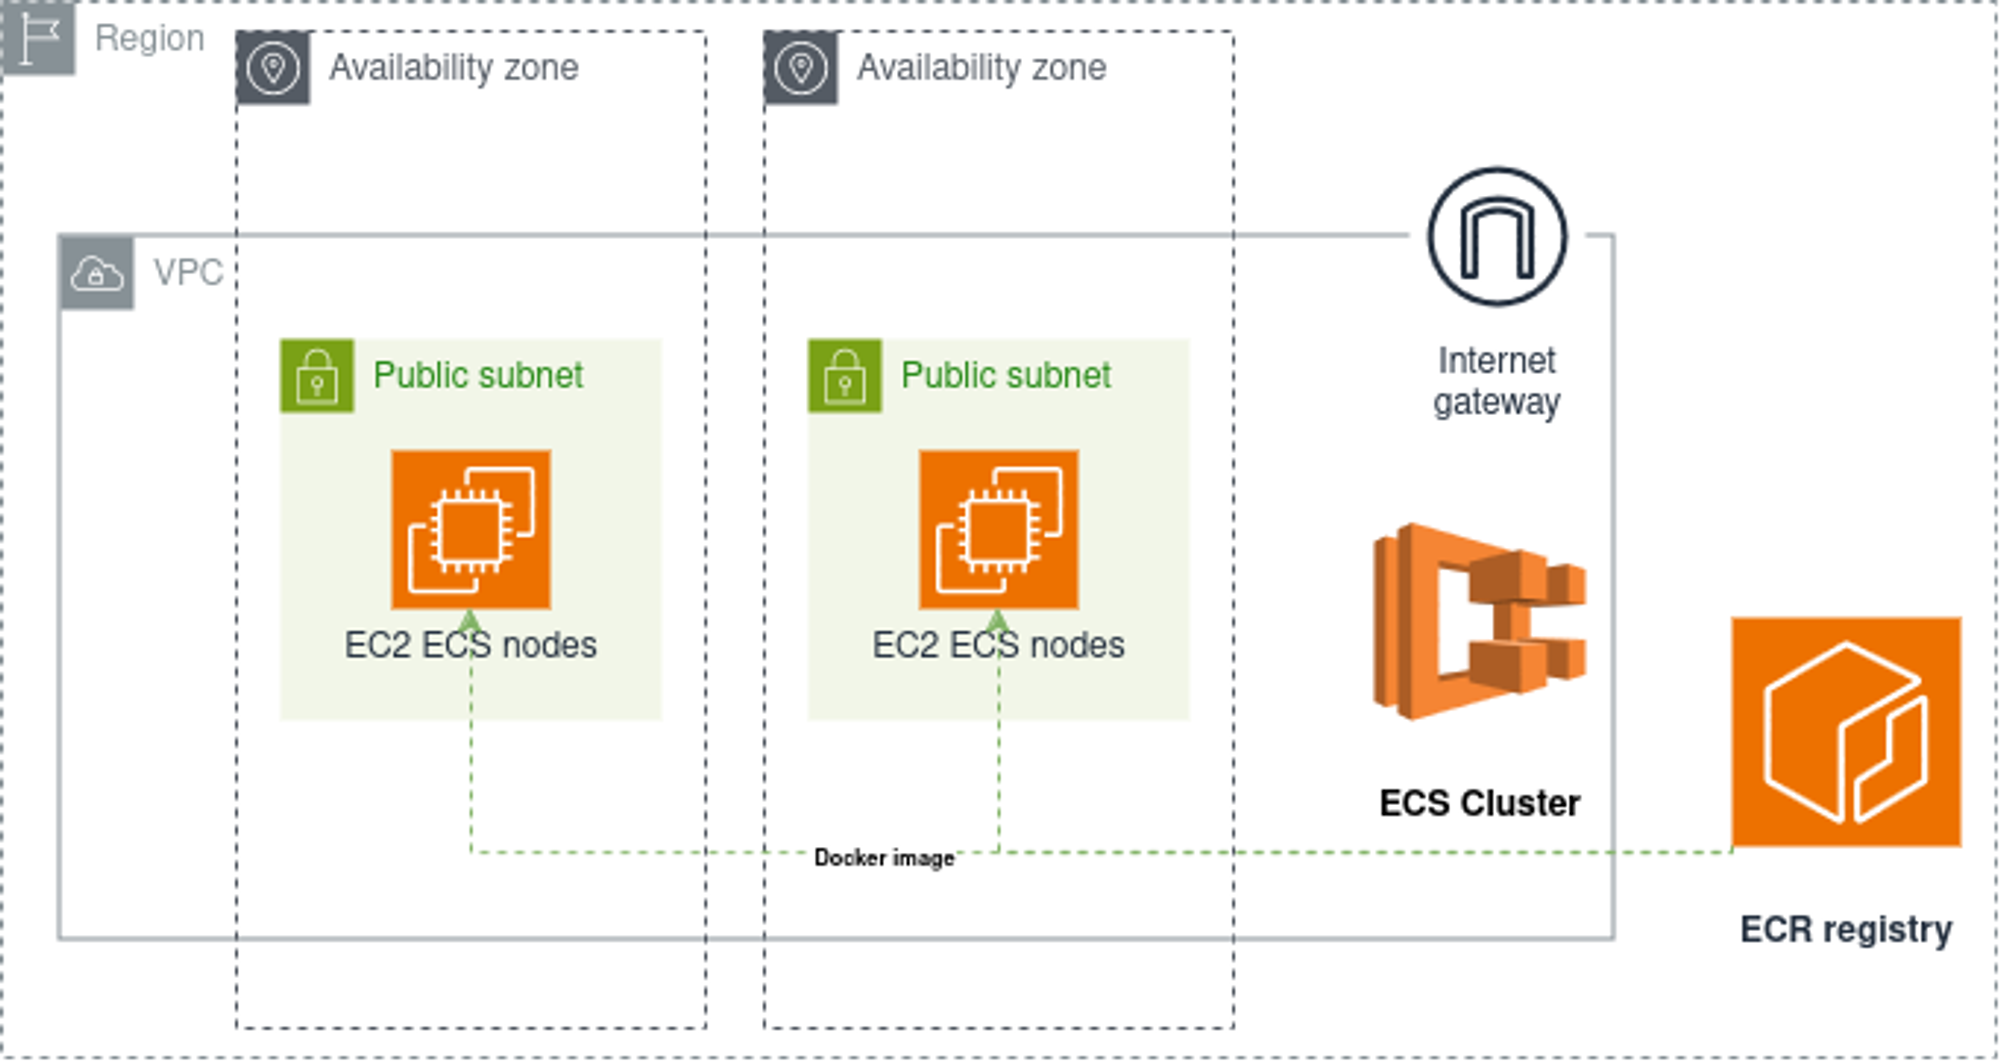
At Stackadoc we use terraform to provision and mange our aws resssources. In this section we will go through the different steps to provision the infrascture, illustrated above and needed to run our daily scraping operations.
Step 1: Building the docker image and uploading the docker image to ECR
resource "aws_ecr_repository" "distributed_scraping_repository" {
  name = "distributed-craping-repository"
}

resource "docker_image" "distributed_scraping_docker_image" {
  name = "${aws_ecr_repository.distributed_scraping_repository.repository_url}:latest"
  build {
    context = "${path.root}/../docker/*"
  }
  triggers = {
    dir_sha1 = sha1(join("", [for f in fileset("${path.root}/..", "docker/*") : filesha1(f)]))
  }
}

resource "docker_registry_image" "image_handler" {
  name = docker_image.distributed_scraping_docker_image.name
}
The following Terraform script creates an AWS ECR (Elastic Container Registry) repository, a Docker image, and pushes that image to the ECR repository.
The image build will be triggered each time any file under the docker/ directory changes. This directory contains the Dockerfile and the entry script that were mentioned in the first section.
The image that we are hosting on ECR will be used by ECS to launch new containers.
Step 2: networking
Next we will create a VPC (Virtual Private Cloud), and configures sub-nets, Internet Gateway and associated route tables. Here’s a walk-through:
data "aws_availability_zones" "available" { state = "available" }

locals {
  azs_count = 2
  azs_names = data.aws_availability_zones.available.names
}
Here, we fetch the names of two availability zones.
resource "aws_vpc" "main" {
  cidr_block           = "10.10.0.0/16"
  tags                 = { Name = "distributed-scraping-vpc" }
}
We create a new Virtual Private Cloud (VPC) with CIDR block 10.10.0.0/16.
resource "aws_subnet" "public" {
  count                   = local.azs_count
  vpc_id                  = aws_vpc.main.id
  availability_zone       = local.azs_names[count.index]
  cidr_block              = cidrsubnet(aws_vpc.main.cidr_block, 8, 10 + count.index)
  map_public_ip_on_launch = true
  tags                    = { Name = "distributed-scraping-public-${local.azs_names[count.index]}" }
}
Next, we set up public subnets in each of the previously fetched availability zones.
resource "aws_internet_gateway" "internet_gateway" {
  vpc_id = aws_vpc.main.id
  tags = {
    Name = "internet_gateway"
  }
}
We create an internet gateway and attach it to our VPC.
resource "aws_route_table" "public" {
  vpc_id = aws_vpc.main.id
  route {
    cidr_block = "0.0.0.0/0"
    gateway_id = aws_internet_gateway.internet_gateway.id
  }
}

resource "aws_route_table_association" "public" {
  count          = local.azs_count
  subnet_id      = element(aws_subnet.public.*.id, count.index)
  route_table_id = element(aws_route_table.public.*.id, count.index)
}
We created two route tables and we associate the gateways to the public subnets to be able to connect to the internet. Notice that we created only two subnets this is only for demonstration purposes. Amazon recommends creating at least 3 subnets for production environments to avoid any availability issues.
Step 3: Provisioning ec2 instances
data "aws_ssm_parameter" "ecs_node_ami" {
  name = "/aws/service/ecs/optimized-ami/amazon-linux-2/recommended/image_id"
}
Here, we fetch the latest ECS optimized AMI (Amazon Machine Image) ID for Amazon Linux 2 from AWS Parameter Store. This ensures that we always use the most current and optimized Amazon Linux 2 image for ECS when creating the underlying EC2 instances that will be running our containers.
resource "aws_launch_template" "distributed_scraping_launch_template" {
  name_prefix   = "stackabot-ecs-template"
  image_id      = data.aws_ssm_parameter.ecs_node_ami.value
  instance_type = "t3.xlarge"

  key_name               = "ecs-key-pair"
  vpc_security_group_ids = [aws_security_group.ec2_security_group.id]
  iam_instance_profile {
    arn = aws_iam_instance_profile.ecs_node.arn
  }

  user_data = base64encode(<<-EOF
      #!/bin/bash
      echo ECS_CLUSTER=${aws_ecs_cluster.distributed_scraping_cluster.name} >> /etc/ecs/ecs.config;
    EOF
  )
}
The aws_launch_template block creates a launch template that will launch a number of identical EC2 machines. On this template, we specify the instance type, image ID, IAM role, and security group. The user_data field, which specifies a script to be run at instance launch, sets the name of the ECS cluster that the EC2 instances will join.
resource "aws_autoscaling_group" "distributed_scraping_autoscaling_group" {
  name_prefix           = "distributed-scraping-auto-sclaing-group"
  vpc_zone_identifier   = aws_subnet.public[*].id
  desired_capacity      = 0
  max_size              = 5
  min_size              = 0
  health_check_type     = "EC2"
  protect_from_scale_in = false

  launch_template {
    id      = aws_launch_template.distributed_scraping_launch_template.id
    version = "$Latest"
  }

  lifecycle {
    ignore_changes = [desired_capacity]
  }

  tag {
    key                 = "Name"
    value               = "distributed-scraping-ecs-cluster"
    propagate_at_launch = true
  }

  tag {
    key                 = "AmazonECSManaged"
    value               = ""
    propagate_at_launch = true
  }
}
Finally, we create the aws_autoscaling_group resource. This block sets up an auto-scaling group that uses the previously defined launch template to bring up new instances. The desired_capacity, max_size, and min_size parameters are used to control the number of instances in the group.
Step 4: creating the ECS cluster
In this section we will create an ECS cluster, an ECS capacity provider, a CloudWatch log group, an ECS task definition, and an ECS service. Let's get to it:
resource "aws_ecs_cluster" "distributed_scraping_cluster" {
  name = "distributed-scraping-cluster"
}
Our ECS cluster named "stackabot-cluster" is created here.
resource "aws_ecs_capacity_provider" "ecs_capacity_provider" {
  name = "distributed-scraping-capacity-provider"

  auto_scaling_group_provider {
    auto_scaling_group_arn         = aws_autoscaling_group.stackabot_autoscaling_group.arn
    managed_termination_protection = "DISABLED"

    managed_scaling {
      maximum_scaling_step_size = 2
      minimum_scaling_step_size = 1
      status                    = "ENABLED"
      target_capacity           = 100
    }
  }
}
We create a capacity provider. It uses our autoscaling group to provide the necessary ec2 infrastructure to run the tasks containers.
resource "aws_ecs_cluster_capacity_providers" "ecs_cluster_capacity_providers" {
  cluster_name = aws_ecs_cluster.distributed_scraping_cluster.name

  capacity_providers = [aws_ecs_capacity_provider.ecs_capacity_provider.name]

  default_capacity_provider_strategy {
    base              = 1
    weight            = 100
    capacity_provider = aws_ecs_capacity_provider.ecs_capacity_provider.name
  }
}
The capacity provider is then associated with our newly created ECS cluster here.
resource "aws_cloudwatch_log_group" "scrapy_log_group" {
  name = "/ecs/scrapy-logs"
  skip_destroy = true
  retention_in_days = 7
}
We also need to create a new log group in CloudWatch Logs. This group will be used to store the logs from our different scrapyd containers.
resource "aws_ecs_task_definition" "scrapy_task_definition" {
  family             = "scrapy-task"
  network_mode       = "bridge"
  task_role_arn      = aws_iam_role.ecs_task_role.arn
  execution_role_arn = aws_iam_role.ecs_exec_role.arn
  cpu                = 4096
  memory             = 15722
  runtime_platform {
    operating_system_family = "LINUX"
    cpu_architecture        = "X86_64"
  }

  container_definitions = jsonencode([
    {
      name      = "scrapy-client"
      image     = "${aws_ecr_repository.stackabot_repo.repository_url}:latest"
      cpu       = 4096
      memory    = 15722
      essential = true

      linuxParameters = {
        initProcessEnabled = true
      }

      logConfiguration = {
        logDriver = "awslogs"
        options = {
          awslogs-create-group  = "true"
          awslogs-group         = "${aws_cloudwatch_log_group.scrapy_log_group.id}"
          awslogs-region        = "eu-west-3"
          awslogs-stream-prefix = "ecs"
        }
      }

    }
  ])

}
The ressource above creates a task definition to describe how our scrapyd containers will be launched. As docker image we used the image hosted in our ecr repository. The container logs will be saved in the cloud watch group that we defined above. We also precised the cpu and memory size necessary to run this task.
resource "aws_ecs_service" "scrapy_service" {
  name                   = "sc-service"
  cluster                = aws_ecs_cluster.distributed_scraping_cluster.id
  task_definition        = aws_ecs_task_definition.scrapy_task_definition.arn
  desired_count          = 0
  enable_execute_command = true

  network_configuration {
    subnets         = aws_subnet.public[*].id
  }

  force_new_deployment = true

  triggers = {
    redeployment = true
  }

  capacity_provider_strategy {
    capacity_provider = aws_ecs_capacity_provider.ecs_capacity_provider.name
    weight            = 100
  }

  lifecycle {
    ignore_changes = [desired_count]
  }
}
Finally, we create our ECS service. For information the ECS service is the ressource responsible for running and maintaining the desired count of scrapyd containers. The service will be attached to our cluster. When creating the service we would like it to spin up to 3 scrapyd containers maximum. We enable execute command to be able to exec inside the containers for debugging purposes. The containers spin up by this service will be attached to the subnets we created in the networking section. The capacity provider will provide the necessary ec2 instances to run the containers.
In the culmination of this series, we successfully established a robust ECS cluster designed to efficiently manage and orchestrate our Scrapyd containers. This scalable infrastructure is pivotal in maintaining a streamlined web scraping operation, showcasing a significant leap forward in distributed data collection.
For those interested in delving deeper or building upon our work, the entire codebase discussed throughout these articles is accessible at: GitHub - Stackadoc's AWS Distributed Scrapy.
Future Directions
There's always room for enhancement and optimization. Two potential areas for further development include:
- Resilience in Failure Handling: Implementing amechanism to gracefully handle container failures by rerouting ongoingspider tasks back to the shared queue. This would significantly improvethe system's resilience, ensuring continuous data collection withoutloss of progress.
- Streamlined Deployment: Integrating AWS CodeDeployfor a seamless update process of the Docker images within the ECScluster. This approach would minimize downtime and facilitate a smoother workflow for deploying updates and improvements.
Acknowledgements
Thank you to all our readers for joining us on this journey. We hope that our exploration into building a distributed scraping system has been both informative and inspiring. As the landscape of web data extraction evolves, so too will the strategies and technologies we employ. We look forward to continuing this journey together.

.svg)


.svg)